Posts

Showing posts from August, 2017

Handmade Tea Cozy From Fabric Scrap

Image
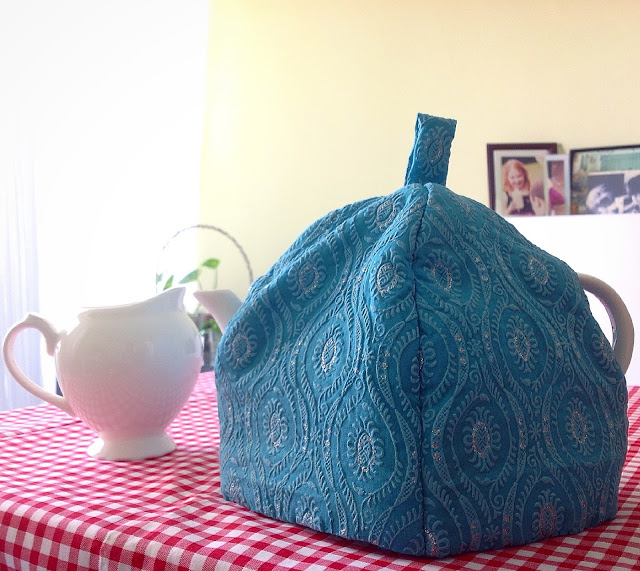
Was tidying up my work/craft table today and found something I made a few months ago - a tea cozy! I remember spending quite a few days stitching away and bled numerous time, thankfully not staining the fabric. I must've gotten busy or distracted by something else (which happens a lot) and totally forgot about it. I'd always love looking at tea cozies as they could come in so many interesting patterns and designs. Surely we can just buy one from the shops, but since I've got quite a bit of fabric scraps lying around it's always better to make full use of them. If you haven't already noticed, this is the same fabric I used for making the access tag holder . I've finally finished off what's left. This was a relatively more complicated sewing project, as I haven't any tea cozy lying around to make reference off. All I did was guessing the structure from pictures I've seen, and put my logical sense to use. Here's what the insi

DIY WIne Glass Charms

Image
We like throwing small dinner parties and enjoy some home cooked food and nice wines - with proper crockery and cutlery - NO disposable ones! But having to keep washing up and drying wine glasses is a pain, especially when everyone seems to get their wine glasses mixed up and decided to get a fresh one. If only we can have something to individualise each wine glass, but obviously not buy putting a horrible looking sticker label over the glass. When I first saw this brilliant product at a department store, I knew that's what I need to add to our list of wine accessories - some wine glass charms! But they aren't cheap; in fact, they are really expensive! Minimum RM50 for a box of 6 or 8 charms, and that's all you can get: just the 6 or 8 different designs. That's when I decided to make our own customised wine glass charms. I started collating everything I need: old pendants, old earrings, beads from some accessories came as unwanted gifts; and bought a bag of w

Upcycled Wine Cork Trivet

Image
Until we started buying screw top wine, I had been painstakingly saving up all the wine corks: cleaning, drying and storing. Thanks to my inexplainable sentiment towards the little brown thing and the thought that one day I would be able to use them for something, I've filled up a whole large shoe box. And they had been in there for 7 long years! Just when I was about to give up and decide to clean them out, I caught a glimpse of a trivet made of wine corks in the background of a TV show. Obviously this is not an original idea and surely there must be others who've already done so, but hey I managed to use up all the corks and turned them into something useful - that's good enough for me. With the help of some Selleys adhesive, I made quite a few trivets and 1 pin cushion. Most importantly: I get to keep them, not bin them ;)

Handmade hanging flower pot holder

Image
Some leftover from a ball of parcel string bought in 2003 is finally put to good use when I made these 2 flower pot holders. Our tiny balcony is running out of space for all our plants, and these crawly babies were twirled around some old disposable chopsticks stuck in the pot. They didn't look very healthy then. Since there are some pre-existing nails on the ceiling (probably fixed by the previous tenant to put up blinds), we thought that a hanging garden would be good for their new home. True enough, they now look really happy with their vines hanging down freely from the pots.

Handmade Card Tag Holder

Image
I have to wear an access tag to work but I've never understood why the tag holders have to be designed the way they are. The lanyard that the office provides has a clip with sharp edges (red arrow), and my arms often get caught on it as I'm a naturally clumsy person. Also, the fabric based lanyard absorbs sweat and dirt so easily in this hot weather, it looks manky and disgusting. Not to mention that it is a plain ugly sight! I tried looking for a commercially made tag holder but they are expensive yet not very user-friendly; and they don't last. After a few scratches and losing some skin on my arms, I had to do something about it. I dug out some fabric scraps I've been keeping for a while, and picked this one - a family member brought some really nice materials back from a trip to India and got some clothes made out of, and I kept the access fabric. No more scratching my poor arms :) The process is really simple - as shown here:

Wine Bag from Old Ikea Blanket

Image
Fabric scraps. What can you do with them when they are neither big enough for another top nor small enough to ignore? I got one piece just like that, with really lovely print. Thankfully, I've also got a bit of the old Ikea blanket left from making the stuffed toy snake . When Ikea blanket scrap meets another fabric scrap, we get a new wine bag! Great for shopping for anything that come in a glass bottle. The old Ikea fleece blanket serves as an internal lining that will stop the glass bottles from knocking each other, while giving the bag a soft spongy feel. 1. Iron out both the fabric scraps 2. Trim the fabrics into equal size, leaving excess on the sides for the printed one. 3. Double-fold in the side of the printed material all around, securing by ironing. 4. Wrap over the trimmed old Ikea blanket, fold the excess sides around it. 5. This is how it should look now. 6. Fold the layered fabrics in half (printed one face out) and stitch the bag up,

DIY Flash Drive Organizer

Image
Due to work, I have to keep quite a few flash drives - each for a different type of job or client - in my bag. Although there are small compartments in my bag, I still find myself having to ransack through other stuff in the same pocket to get to the right flash drive. I've looked everywhere for a flash drive organizer but I just can't find one that I like; and most importantly, I do try not to make unnecessary new purchases. So I went to get some inspiration and help from my sewing box, and made this: I found some fabric scrap big enough for my flash drive organizer pattern, an old zip I saved from some old clothes, and an old and partly used Ikea fleece blanket (which I've used some for the snake stuffed toy ). Here are the few simple steps of the making of the flash drive organizer that's now happily residing in my bag: 1. Little pockets sewn onto the inner layer, then wrapped around with the fabric.   2. Secure the sides with a basting stitch,

Velvety drawstring knapsack made from old dress

Image
No matter how careful I am, I sometimes buy things that I end up not using much - like this brown velvety halter dress. I bought it for some special occasion but it has not been worn much since. As you grow older, the chance of getting invited to parties and going to gigs reduces tremendously; this dress became too dressy for just going out in the day. After a few drafts on the drawing board, I've decided that I will make a simple knapsack out of it. The halter neck tie around strap is cut off to make into a thin scarf, and the length from above the waist and down is cut into this: The bottom hem is sewn together to make the base The top bit is hemmed up to leave openings for the drawstring Each corner of the bottom is sewn into triangular flap to make a depth on the base Leftover fabric (from the top bit of the dress) made into pockets on the inside of the bag. The rest of the leftover fabric is used to make a pocket on the outside, complete with zipper (a

Handmade beaded choker necklaces

Image
I love chokers but I can never find anything I like that would fit nicely on my skinny bony neck. That's when I started buying colourful beads in small packages and having a go at making my own beaded jewellery. Here are 2 of my early attempts that cost me less than £2 in total, but I have worn each of them to many parties and concerts, and am still not sick of them yet. I wear them with dresses to more formal functions but I can also match them with jeans or casual wear on a day out. I've also made some bracelets and belts out of my beads projects.

Handmade beaded pearly bracelet

Image
I have a dress with some lovely beads sewn on the front, but they started to come off after several wash (although I only do hand washing because we don't have a washing machine). I've tried sewing them back on but some beads have gone missing so I had to take them all off and kept them with my stash of beads collection for future use. After a few drafts and drawings on the back of some old receipts (yep I use them as note pads), and a couple of trials and errors, I made myself a new pearly bracelet out of those fallen beads from my dress. This one is a slip-on with no hooks or buckles so it's really convenient, and just in time for Christmas!

Turn an old ripped skirt into handbag

Image
In life you often come across things that you love so much you hang on to it whatsoever. I had a short checkered skirt that was altered from a long skirt because it was stained by some green paint, which I had worn from mid 90's till 2009, when I noticed a hole on the back of it. I had no idea how it got there but it is definitely not mendable. I was devastated as it was one of my favourites, and I certainly can't make it any shorter! Last worn on 3 April 2009, Lee on Solent Stubborn as I am, I refused to throw it away just yet. So I decided to make a bag out of it. The actual process of making it was not that long, but it was the waiting for the right material to come along. My sister passed me some old straps she took from her old ripped travel bags so I used some to make the straps, as well as the horizontal line pattern by the straps. The bottom piping was made by wrapping fabric from an old t-shirt (that was waiting to become a cleaning cloth) around an old cord

Recycled gift wrapping

Image
Although I make a point to tell all my friends not to give me any presents to avoid unwanted gifts and excessive gift wrapping, I still get nicely wrapped gifts from time to time. When I do I will unwrap them very carefully and keep almost everything - from the gift wrapper, greeting cards to the ribbons and trimmings - and reuse them whenever I can. This month I happen to have some gifts to give away, so I've recycled these wrappers and cards. The purple patterned wrapper in the foreground is from a Christmas present I received in 2008. The white tissue wrapper in the background came from a clothing packaging. The dark pink tissue wrapper underneath is from another gift I received some years ago (which will be used for wrapping the other present) . The gift cards are cut out from old birthday cards. The ribbons are taken from an old top I dismantled. Nothing is new here except for what's wrapped inside, which is the most important thing. But I think they still lo

Upcycled Pendant from Old Nine West Shoe Jewellery

Image
Took less than 5 minutes, this is probably the fastest project to date. No one would've guessed its past life if I don't tell. This was the pair of Nine West shoes I bought at a really great promotion price. Loved them, worn them to death - literally.  But I'm not quite ready to part with them completely yet, and the decorative jewels still look good. So before I binned the shoes, I removed the shoe jewellery from both shoes and turned them into pendants. Yes I now have 2 Nine West - so to say - pendants, and why not?

Upcycled Padded iPad Case from an Old Cancer Research Canvas Bag

Image
Since making the  Passport Boarding Pass Holder  from the old Cancer Research bag, my sore fingers have had some good rest so it's time to do something with the remaining material. Using the same method as the  Passport Boarding Pass Holder , I made an iPad case: I've used an old worn out vest (the size was just nice) as the lining,  so that the case will have some kind of padding as extra protection for the iPad. Securing the padding (old vest) with rough running stitch on both ends.   After doing proper back stitching on both ends, fold into half and stitch on both sides. Turn inside out. Unused hair rubber bands stitched under buttons to make loops, then stitch 2 buttons on the other side. In our memory, but now serving even better purposes: The Cancer Research canvas bag before the make over